I begin to write a strong interesting new functionality in Phratch: the Meta Repository.

The idea comes from Pharo: The Meta Repository is an area where you can put the installation process (in our words, a Metacello Configuration) of an extension of Phratch.

You can build a Metacello configuration based on the chapter already written about Metacello, available here: http://pharobooks.gforge.inria.fr/PharoByExampleTwo-Eng/latest/Metacello.pdf.
For now, you just need to have a class that has the pattern name ConfigurationOgYourAddOnName, where YourAddOnName should be changed by the name you want.

Then, just put the new configuration package on the PhratchMetaRepo, using Metacello, and putting it on the server: http://smalltalkhub.com/mc/JLaval/PhratchMetaRepo/main
using the following configuration of the Monticello configuration:

MCHttpRepository
    location: 'http://smalltalkhub.com/mc/JLaval/PhratchMetaRepo/main'
    user: ''
    password: ''

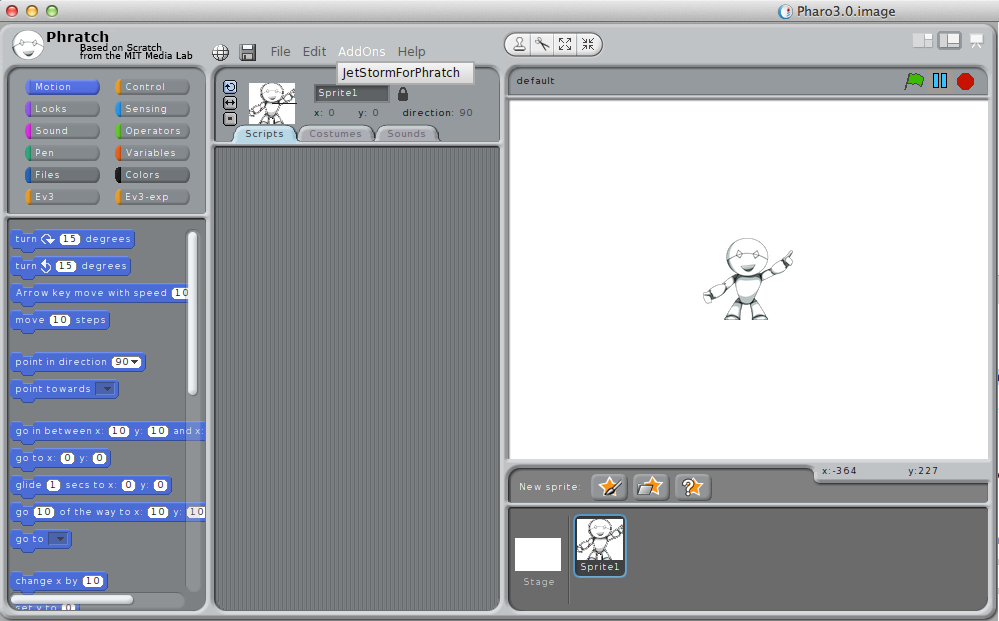
Finally, on the user side of Phratch, you can see a new menu “AddOns”, where you can install all new add-ons. For now, there is one project: JetStorm for Phratch, that allows one to connect the robots Lego Mindstorms to Phratch.

I hope a lot of new projects will appear in following months.

Jannik

As part of the PhaROS and related projects, Santiago Bragagnolo had developed TaksIt a  framework for to ease handling concurrency. Expressing and managing concurrent computations is indeed a concern of importance to develop applications that scale. A robotic application often have different processes dealing with different activities (e.g. preception, planning, …).

TaskIT provides abstractions to schedule and/or parallelize of the execution of pieces of code. They will be described in the forthcoming chapter of the Pharo for the Entreprise book. First content is already available online. You can also get the code by evaluating the following expression in a Pharo workspace:


Gofer it
smalltalkhubUser: 'sbragagnolo' project: 'TaskIT';
configurationOf: 'TaskIT';
loadVersion: #bleedingEdge

Goal

Automatically copy files that are added or modified in a specific folder of an svn repository.
Useful for Web sites, …

Prepare a post-commit script

cd /svn/robots/hooks
cp post-commit.tmpl post-commit
chmod ug+x post-commit

Be careful of the owner/group of this post-commit file because it is the unix user that is dedicated to execute post-commits that must have executable rights.

The post-commit script

Example of script that checks if files in “PhaROS/Scripts” are involved in the latest commit.
If yes, copy them in /var/www.

#!/bin/sh

REPOS="$1"
REV="$2"

for scriptfile in `svnlook changed /svn/robots | awk -F "PhaROS/Scripts/" '{print $2}' | xargs`; do
        svn export --force --non-interactive -q  file:///svn/robots/PhaROS/Scripts/$scriptfile /var/www/Scripts/$scriptfile
done

Test the script

./post-commit /svn/robots 395

Be careful of the rights here too.
This post-commit script may be executed by a different user than yours when testing like above.
The real test is to modify the files in a repository copy and effectively do a commit.


PhaROS has being in this last edition of FOSDEM (2014) we are proud to share our time and space with a lot of open source projects. Thank you very much for good feelings, feedback and sharing this amazing time.
Video and photos from this great event will be soon available here. Meanwhile, here are the slides

Keep tuned!

PhaROS tool has the mission of installing and creating packages into a ROS installation.

For doing this we have several commands, from installing and creating to administrating repositories, so you can manage your own packages and creating templates without major problems.

Install PhaROS tool

We are working for having this package in Ubuntu and ROS repositories, but meanwhile you can download it from here: pharos-deb

Once downloaded just execute

sudo dpkg -i pharos.deb

pharos –help


Install PhaROS based Package

pharos install PACKAGE [OPTIONS]

Example

pharos install esug –location=/home/user/ros/workspace –version=2.0

Help

pharos install –help

 Create PhaROS based Package

pharos create PACKAGE [OPTIONS]

Example

pharos create –location=/home/user/ros/workspace –version=2.0 –author=YourName –author-email=YourEmail

Tip: Be sure the email is a correct one. If is not a correctly spelled one you will notice during last step.
Help
pharos create –help

Register Repository of packages

pharos register-repository –url=anUrl –package=aPackage [ OPTIONS ]

Example

pharos register-repository –url=http://smalltalkhub.com/mc/user/YourProject/main –package=YourProjectDirectory –directory=YourProjectDirectory

Tip: If your repository requires user/password for reading add –user=User –password=Password to the example.
Disclaimer: User/Password will be stored in a text file without any security.
Help

pharos register-repository –help

Listing registered repositories

pharos list-repositories

Creating a directory for your own project repository

pharos create-repository PACKAGENAME [ OPTIONS ]

Example

pharos create-repository example –user=UserName > directory.st
pharos create-repository example –user=UserName  –output= directory.st

Help

pharos create-repository –help


We are now really glad to present an enhanced way to deal with PhaROS.

Since we want to keep with the ROS community spirit of collaborative development for robotics, we introduce now our own command for managing packages made in PhaROS.

This command is mean to install existing packages and create new packages with cool snippets and examples for going faster through the learning time.

PhaROS tool is made completely in Pharo smalltalk and it allows to deploy an existent package into a pharo 1.4/2.0/3.0 in any distribution of ROS that uses catkin package. It automatize the generation xml, makefiles, type and scripts creation, going on the direction of letting the pharo programmer to focus just in programming and not in infrastructure stuff.

For Installing and Using please check this post: using-pharos-tool


CodeJam is a programming contest. It includes a lot of problems.
For each problems, 2 data sets are provided: a small one and a large one. It is really interesting to learn programming.
You can try a solution on the small data set and also send it to the CodeJam web site to know if it is correct and then try on the larger data set.

CJSover is a framework written in Pharo to easily implement algorithms to solve CodeJam problems.
It simplifies data file reading and writing. I also implemented some (really naïve and non-optimized ;-)) solutions to some problems.
And for those “solved” problems, I commit here the correct solution to then be able to run automated tests that re-run them.

HOW TO USE

$ git clone https://github.com/LucFabresse/CJSolver.git CJSolver.git
$ cd CJSolver.git
$ sh newImage.sh                # this will download the Pharo VM + Pharo image + load the CJSolver code
$ ./pharo-ui cjsolver.image

I did this small framework because:
- I want that students learn Pharo,
- I want that students participate to some programming contests using Pharo,
- I want to show students that YES, we can also implement these problems in Pharo

Please, checkout the code,
optimize already implemented solutions,
or implement solution to new problems,
and have fun ;-)

1- Create a category

Before creating a block, you probably need to create a category. By default, in Phratch there are 10 shown categories. Each of these categories has 4 properties:

  • a label, which is shown as the name of the category (for example “Motion”)
  • a color, which is the color of the blocks inside the category. For now, the category has not necessarily the same color because the display of a category is based on an image in the scrachSkin subdirectory. This point is not explained here. We will use a basic color for the category.
  • an order number, which represents the place of your category in the display screen.
  • a viewer page, which represents how the category is displayed when we click on it. Most of the categories have the basic behavior (displaying blocks), but sometimes, we can need specific ones. For example,the category “Variables” has some buttons (Make a variable, Make a list and Make a block). Here we will use the basic viewer page.

So, let’s go for creating our own category.
In the Pharo environment, create a class which is a subclass of PhratchCategory, like the following one:

PhratchCategory subclass: #PhratchCategoryMyFirst 
    instanceVariableNames: ''
    classVariableNames: ''
    poolDictionaries: ''
    category: ‘MyOwnBlocks’

In the class side of your new class, add these methods:

color
    ^(Color r: 0.1 g: 0.2 b: 0.7)

where the color can have others values.

label
    ^'my category'

This label will be used to place your future block in this category and is used for the display.

order
    ^9

which gives the place where the category will be placed.

Your first category is done. Congratulation !
To see it in Phratch, just relaunch Phratch, with this command:

PhratchFrameMorph closeAndOpen.

Your empty category is available in the Phratch environment.

A last thing about category: when a category is created, a new setting appears in the Setting browser. This setting allows to show or hide the category in Phratch. By default, the value is true.

2- Create a specific sprite

In Phratch a block is a message sent to a Sprite. By default the Sprite “Sprite1” is a PhratchSpriteMorph. If you need to have a specific behavior, just create a subclass of it. Then, you will have the possibility to select this new specific sprite when creating a new sprite in Phratch.

In this tutorial, we do not create a new sprite. We will use the generic one.

3- Create a first blocks

In PhratchSpriteMorph, create a protocol “*MyOwnBlocks”, to be clean with the modularity of the system.
Then you can add your behavior. It can be what you want. For example, I want to open a Transcript. For that, my method is:

openTranscript
    ^Transcript open

For now, the method is not visible in Phratch. To make it visible, add the following pragma:

openTranscript
    <phratchItem: 'open a transcript'
        kind: #-
        category: 'my category'
        defaultValues: #()
        subCategory: #a
        special: #()>
    ^Transcript open

When updating the view in Phratch, by clicking on “My category” a new block appears. By clicking on this block a transcript appears.
You have written your first block !

4- About the pragma

The pragma used to declare a new block in Phratch has the following form:

<phratchItem: '' kind: #- category: '' defaultValues: #() subCategory: #a special: #()>
  • phratchItem contains the label of the block. It contains also the entry for parameters.
  • kind is the kind of block. By default “#-“ means that the block is a CommandBlockMorph.
  • defaultValues is an array with the default parameter if your block needs them.
  • subCategory is a symbol that allows you to order blocks inside your category.
  • special is an array with special behavior that should be executed on the block before the block execution (the main use is the parametrization of the block itself).

Let’s go for another example. Write this method, which open a Nautilus browser a a specific class:

openBrowserOn: aStringClass
    <phratchItem: 'open a browser on: $String$'
        kind: #-
        category: 'my category'
        defaultValues: #('Collection')
        subCategory: #a
        special: #()>
    Nautilus fullOnClass: (Smalltalk at: aStringClass asSymbol)

Here, you can see that a parameter is present in phratchItem: this parameter is a String. So, we have a block that open a browser on a class that you can parametrize. The default value is ‘Collection’. You can change it by an existing class.

In Phratch environment, click on this new block, you will see a browser on Collection.

5- Types

All types are declared in the class PhratchType.
Each type is declared with the pragma <phratchType: #’’>. You can browse these methods to see existing types.

6- Kind of blocks

A block can have multiple forms. In our examples, we manipulated the CommandBlockMorph. It exists multiple ones. You can see them as subclasses of BlockMorph.
The main ones are CommandBlockMorph that executes a command, ReporterBlockMorph that returns a value, BooleanBlockMorph that returns a boolean.

I stopped this tutorial here. It is enough to write simple blocks in Phratch. You can discover kinds of block or types by right-clicking on an existing block of the system, then ‘show block’ in the menu. You will see the method and particularly the associated pragma.
Dear smalltalkers, phratchers and everybody interested to help Phratch development.
We need you as an international community. Phratch needs your help to be multilingual.

The most of work is already done, It is based on the Scratch work (Thank you for all the supported languages). Now, as Phratch has a lot of new features, we need to translate each of these new features.

For each of the following languages (ar, bg, ca, cs, da, de, el, es, et, eu, fa, fi, fr_CA, gl, he, hr, ht, hu, id, is, it, ja_hira, ja, kn, ko, lt, mk, mn, mr, ms, ne, nl, no, pl, pt_br, pt, ro, ru, rw, sk, sl, sv, th, tr, uk, vi, zh_cn, zh_tw), we need to complete the lines available in the phratch issue tracker (https://code.google.com/p/phratch/issues/detail?id=120). You can post your work as a comment or send me a mail, I will then integrate it in Phratch.

For each expression there is a msgid in english, that should not be changed. Then, there is a msgstr that should be complete in the specific language. All elements in the $$ (like $Number$) are variables, they should not be changed but they have to be integrated in your translation. For example, in french:
===
msgid “replace costume $Number$ with $NewCostume$”
msgstr “remplacer le costume $Number$ avec $NewCostume$”
===

There is less than 130 small expressions. It is 1 or 2 hours of work, and it helps us a lot.

Thank you for your help.