Jetstorm is the library to make Pharo communicate with the Lego Mindstorm Ev3. We provide the technical report. It explains the protocol and the architecture of the library.

If you want to cite it, here is the lines to copy and paste in bibtex:

@techreport{Lava14a,
   Author = {Jannik Laval},
   Institution = {URIA -- Ecole des Mines de Douai},
   Title = {JetStorm - A communication protocol between Pharo and Lego Mindstorms},
   Url = {www.jannik-laval.eu/assets/files/papers/Lava14a-JetStorm.pdf},
   Year = {2014}
}

With the evolution of JetStorm, the Technical Report will be improved.

I begin to write a strong interesting new functionality in Phratch: the Meta Repository.

The idea comes from Pharo: The Meta Repository is an area where you can put the installation process (in our words, a Metacello Configuration) of an extension of Phratch.

You can build a Metacello configuration based on the chapter already written about Metacello, available here: http://pharobooks.gforge.inria.fr/PharoByExampleTwo-Eng/latest/Metacello.pdf.
For now, you just need to have a class that has the pattern name ConfigurationOgYourAddOnName, where YourAddOnName should be changed by the name you want.

Then, just put the new configuration package on the PhratchMetaRepo, using Metacello, and putting it on the server: http://smalltalkhub.com/mc/JLaval/PhratchMetaRepo/main
using the following configuration of the Monticello configuration:

MCHttpRepository
    location: 'http://smalltalkhub.com/mc/JLaval/PhratchMetaRepo/main'
    user: ''
    password: ''

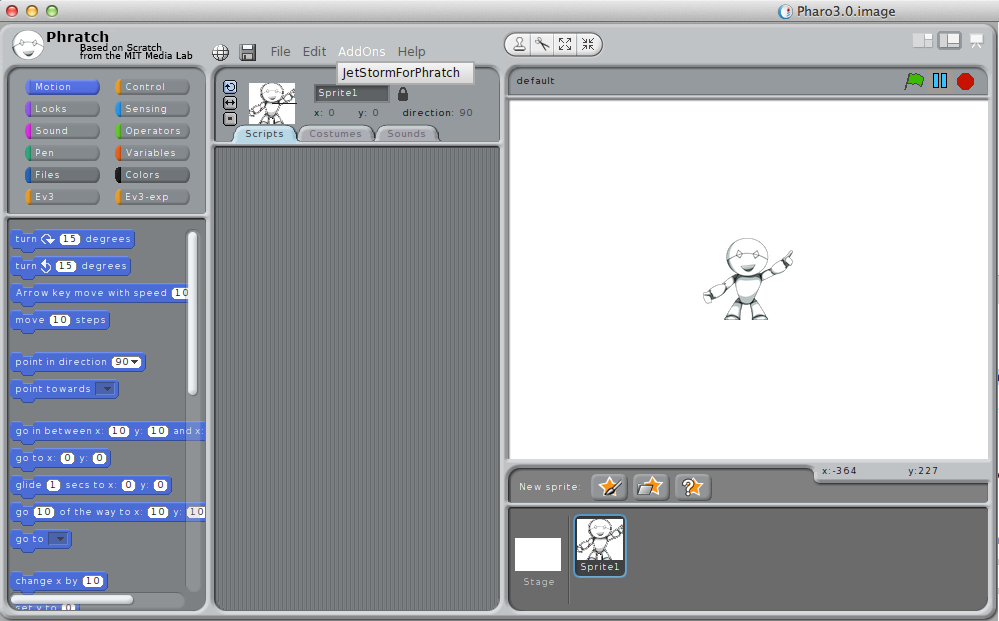
Finally, on the user side of Phratch, you can see a new menu “AddOns”, where you can install all new add-ons. For now, there is one project: JetStorm for Phratch, that allows one to connect the robots Lego Mindstorms to Phratch.

I hope a lot of new projects will appear in following months.

Jannik

1- Create a category

Before creating a block, you probably need to create a category. By default, in Phratch there are 10 shown categories. Each of these categories has 4 properties:

  • a label, which is shown as the name of the category (for example “Motion”)
  • a color, which is the color of the blocks inside the category. For now, the category has not necessarily the same color because the display of a category is based on an image in the scrachSkin subdirectory. This point is not explained here. We will use a basic color for the category.
  • an order number, which represents the place of your category in the display screen.
  • a viewer page, which represents how the category is displayed when we click on it. Most of the categories have the basic behavior (displaying blocks), but sometimes, we can need specific ones. For example,the category “Variables” has some buttons (Make a variable, Make a list and Make a block). Here we will use the basic viewer page.

So, let’s go for creating our own category.
In the Pharo environment, create a class which is a subclass of PhratchCategory, like the following one:

PhratchCategory subclass: #PhratchCategoryMyFirst 
    instanceVariableNames: ''
    classVariableNames: ''
    poolDictionaries: ''
    category: ‘MyOwnBlocks’

In the class side of your new class, add these methods:

color
    ^(Color r: 0.1 g: 0.2 b: 0.7)

where the color can have others values.

label
    ^'my category'

This label will be used to place your future block in this category and is used for the display.

order
    ^9

which gives the place where the category will be placed.

Your first category is done. Congratulation !
To see it in Phratch, just relaunch Phratch, with this command:

PhratchFrameMorph closeAndOpen.

Your empty category is available in the Phratch environment.

A last thing about category: when a category is created, a new setting appears in the Setting browser. This setting allows to show or hide the category in Phratch. By default, the value is true.

2- Create a specific sprite

In Phratch a block is a message sent to a Sprite. By default the Sprite “Sprite1” is a PhratchSpriteMorph. If you need to have a specific behavior, just create a subclass of it. Then, you will have the possibility to select this new specific sprite when creating a new sprite in Phratch.

In this tutorial, we do not create a new sprite. We will use the generic one.

3- Create a first blocks

In PhratchSpriteMorph, create a protocol “*MyOwnBlocks”, to be clean with the modularity of the system.
Then you can add your behavior. It can be what you want. For example, I want to open a Transcript. For that, my method is:

openTranscript
    ^Transcript open

For now, the method is not visible in Phratch. To make it visible, add the following pragma:

openTranscript
    <phratchItem: 'open a transcript'
        kind: #-
        category: 'my category'
        defaultValues: #()
        subCategory: #a
        special: #()>
    ^Transcript open

When updating the view in Phratch, by clicking on “My category” a new block appears. By clicking on this block a transcript appears.
You have written your first block !

4- About the pragma

The pragma used to declare a new block in Phratch has the following form:

<phratchItem: '' kind: #- category: '' defaultValues: #() subCategory: #a special: #()>
  • phratchItem contains the label of the block. It contains also the entry for parameters.
  • kind is the kind of block. By default “#-“ means that the block is a CommandBlockMorph.
  • defaultValues is an array with the default parameter if your block needs them.
  • subCategory is a symbol that allows you to order blocks inside your category.
  • special is an array with special behavior that should be executed on the block before the block execution (the main use is the parametrization of the block itself).

Let’s go for another example. Write this method, which open a Nautilus browser a a specific class:

openBrowserOn: aStringClass
    <phratchItem: 'open a browser on: $String$'
        kind: #-
        category: 'my category'
        defaultValues: #('Collection')
        subCategory: #a
        special: #()>
    Nautilus fullOnClass: (Smalltalk at: aStringClass asSymbol)

Here, you can see that a parameter is present in phratchItem: this parameter is a String. So, we have a block that open a browser on a class that you can parametrize. The default value is ‘Collection’. You can change it by an existing class.

In Phratch environment, click on this new block, you will see a browser on Collection.

5- Types

All types are declared in the class PhratchType.
Each type is declared with the pragma <phratchType: #’’>. You can browse these methods to see existing types.

6- Kind of blocks

A block can have multiple forms. In our examples, we manipulated the CommandBlockMorph. It exists multiple ones. You can see them as subclasses of BlockMorph.
The main ones are CommandBlockMorph that executes a command, ReporterBlockMorph that returns a value, BooleanBlockMorph that returns a boolean.

I stopped this tutorial here. It is enough to write simple blocks in Phratch. You can discover kinds of block or types by right-clicking on an existing block of the system, then ‘show block’ in the menu. You will see the method and particularly the associated pragma.
Dear smalltalkers, phratchers and everybody interested to help Phratch development.
We need you as an international community. Phratch needs your help to be multilingual.

The most of work is already done, It is based on the Scratch work (Thank you for all the supported languages). Now, as Phratch has a lot of new features, we need to translate each of these new features.

For each of the following languages (ar, bg, ca, cs, da, de, el, es, et, eu, fa, fi, fr_CA, gl, he, hr, ht, hu, id, is, it, ja_hira, ja, kn, ko, lt, mk, mn, mr, ms, ne, nl, no, pl, pt_br, pt, ro, ru, rw, sk, sl, sv, th, tr, uk, vi, zh_cn, zh_tw), we need to complete the lines available in the phratch issue tracker (https://code.google.com/p/phratch/issues/detail?id=120). You can post your work as a comment or send me a mail, I will then integrate it in Phratch.

For each expression there is a msgid in english, that should not be changed. Then, there is a msgstr that should be complete in the specific language. All elements in the $$ (like $Number$) are variables, they should not be changed but they have to be integrated in your translation. For example, in french:
===
msgid “replace costume $Number$ with $NewCostume$”
msgstr “remplacer le costume $Number$ avec $NewCostume$”
===

There is less than 130 small expressions. It is 1 or 2 hours of work, and it helps us a lot.

Thank you for your help.

Do you know Lego MindStorms ? The last one is the Ev3 serie (http://www.lego.com/fr-fr/mindstorms/). One particularity of this version compared to the previous ones is the possibility to plug a Wifi key and connect via TCP.

So, if you have this material (one Mindstorms Ev3, one compatible Wifi key), you can control your robot with Pharo !

Just load these lines:

Gofer it
     url: 'http://smalltalkhub.com/mc/JLaval/JetStorm/main'      username: ''
     password: '';
     package: 'ConfigurationOfJetStorm';
     load.
(Smalltalk at: #ConfigurationOfJetStorm) loadBleedingEdge.

I know also that for Christmas, it is not possible to learn a new API, we all have a lot of other things to do ! So, you can play with it into Phratch.

For that, just load Phratch and the package EV3Phratch as follow.

Gofer it
       url: 'http://smalltalkhub.com/mc/JLaval/Phratch/main'        username: ''
       password: '';
       package: 'ConfigurationOfPhratch';
       load.
(Smalltalk at: #ConfigurationOfPhratch) loadBleedingEdge.
Gofer it
       url: 'http://smalltalkhub.com/mc/JLaval/JetStorm/main'        username: ''
       password: '';
       package: 'EV3Phratch';
       load.

Have fun !

I continue to develop Phratch, the port of Scratch in Pharo. Phratch is a visual programming language on top of Pharo.

There are lots of new features:

  • Settings
  • FileSystems
  • Metacello
  • integration of BYOB (allows to build your own blocks)
  • integration of Color and Files
  • a lot of new useful blocks
  • projects saved with Fuel
  • possibility to implement new features without modifying the core of the system
  • possibility to customize the environment: add new categories, add new kinds of Sprite, add new blocks.

Phratch is available for Pharo2.0 with the following configuration:

Gofer it 
    url: 'http://smalltalkhub.com/mc/JLaval/Phratch/main'
    username: '' 
    password: ''; 
    package: 'ConfigurationOfPhratch';
    load.
((Smalltalk at: #ConfigurationOfPhratch) project version: '1.0') load.
(Smalltalk at: #PhratchFrameMorph) open perform: #saveImageForEndUserSilently.

I hope to write documentations about all of the new features asap.


At the ESUG 2013 conference, we presented the current status of the RoboShop project. Santiago did a great job and now we are able to run tests of our scenario of a helper robot  in a shopping mall. Based on a map built using laser SLAM, the robot computes the shortest path to fetch items listed by a customer in a shopping list. The slides below include a video of the first tests. They also give a bird’s eye view of the architecture, where we use Pharo for orchestration. We also reuse existing software from the ROS community through our client PhaROS.


In this post, I will explain how to install Phratch on an Android device. I created the .apk file for an ARM architecture. The following instructions are based on this page.

Prerequirements:
  • Download Android SDK: http://developer.android.com/sdk/index.html
  • Ant should be installed: http://ant.apache.org/
Image preparation:

First, download  a Pharo 2.0 image and execute the following code. It loads the necessary code for Android support and the Phratch package. Deprecation raiseWarning: false; showWarning: false.

"Installation of Android support"
Gofer new
 url: 'http://source.squeak.org/VMMaker';
 package: 'Android-Base';
 load.
SmalltalkImage checkSourcesFileAvailability: false.
SmalltalkImage checkChangesFileAvailability: false.
"2 - installation of Phratch"
Gofer it
 url: 'http://smalltalkhub.com/mc/JLaval/Phratch/main'
 username: ''
 password: '';
 package: 'ConfigurationOfPhratch';
 load.
(Smalltalk at: #ConfigurationOfPhratch) loadBleedingEdge.

Then, you can execute the following lines that makes Phratch be in User mode:

StartupLoader default removeAllScriptsFromAllDirectories; initialize.
PhratchFrameMorph open saveImageForEndUserSilently.
Image splitting

Now, split your image:

split -d -b 1m /path/to/myapplication.image myapplication.

In macosX, the option -d does not exist. It means that you should remove it and rename all created files with extensions as .00, .01, .02, …

Creation of the Android project

Create a new folder for the project. Inside it, unzip the makevm.zip (https://ci.inria.fr/pharo-contribution/view/VM/job/CogDroid/).
Go inside the dir, and, inside it, unzip the nativeVM-xxx.zip (https://ci.inria.fr/pharo-contribution/view/VM/job/CogDroid/). I use the arm file.

Then do

 mkdir -p src/phratch/eu/android

Then create a .java file in src/phratch/eu/android/Phratch.java, which contains:

package phratch.eu.android;
 import org.golubovsky.cogstack.CogActivity;
 public class Phratch extends CogActivity {
 }

In assets/image, push the image splitted file (files with extension .00, .01, …), and run:

ls -l assets/image/

Make sure subdirectory assets/zipped exists. From https://code.google.com/p/phratch/downloads/list, download in this folder the files ScratchSkin.zip, Manual.zip, locale.zip, Media.zip, and Help.zip.

Customize of the Android project

Now, comes the need to change files. Go back in the makevm folder.

In AndroidManifest.xml

  • change @@PACKAGE@@ by “phratch.eu.android”
  • change @@ACTIVITY@@ by “Phratch”

In build.xml

  • change @@BUILD@@ by “Phratch-android”

In res/values/strings.xml

  • change @@BUILD@@ by Phratch-android

In local.properties

  • change the line sdk.dir by the full path of your sdk, mine is sdk.dir=/Users/janniklaval/Desktop/phratch-and/makevm/sdk

In project.properties, change the two following lines:

  • target=android-4
  • android.library.reference.1=../../project/

by

  • target=android-17
  • android.library.reference.1=project/

In project/local.properties

  • change the line sdk.dir by the full path of your sdk, mine is sdk.dir=/Users/janniklaval/Desktop/phratch-and/makevm/sdk

In project/project.properties, change the following line:

  • target=android-4

by

  • target=android-17

In res/drawable/, you can replace icons.

Finish the creation of the .apk

Run the commands:

 ant clean
 ant debug

You can run

 ant release

The installable apk file will be under bin: Phratch-android-debug.apk.